Development
This page describes PyBoy’s core structure, execution flow, plugins, and test suites. For development dependencies, see Getting started; for source-build instructions, see Install and build. For preparing a contribution, see Contributing.
Running PyBoy during development
Run a ROM directly from the source tree with:
python3 -m pyboy path/to/rom.gb
The debug plugin can be enabled with:
python3 -m pyboy path/to/rom.gb --debug
Debug mode opens diagnostic views for inspecting emulator state and graphics.
Breakpoints can also be supplied at startup with the --breakpoints option.
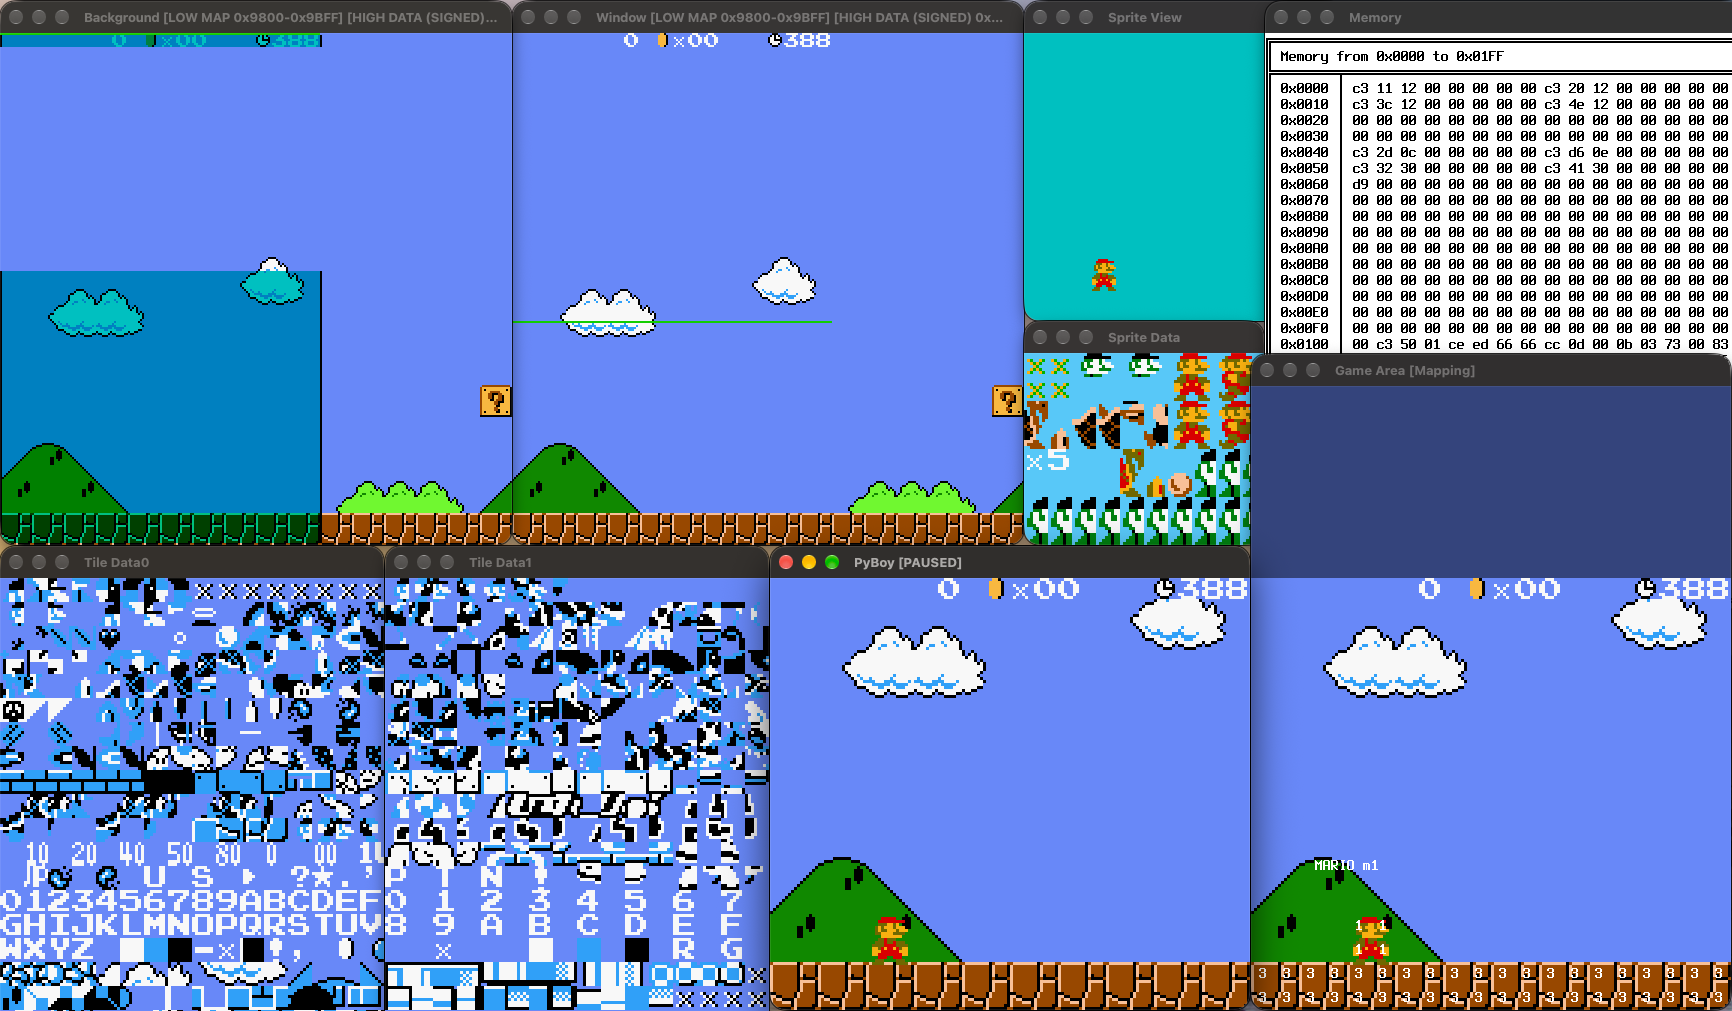
Debug mode and debug logging are separate features. To enable verbose logging, use:
python3 -m pyboy path/to/rom.gb --log-level DEBUG
A typical development loop is:
change code -> make build -> run a ROM -> inspect the debugger or logs
For changes to Cython declarations, or if generated files may be stale, use
make clean && make to force a fresh build. See
Install and build for platform-specific build requirements.
See Plugins and game wrappers for optional windows, screen recording, and rewind features.
Core architecture
The public PyBoy class drives the emulator, while the motherboard
(MB) is
the center of the emulated hardware:
PyBoy.tick()
    |
    v
Motherboard (MB)
    |
    +-- CPU
    +-- Cartridge and MBC
    +-- RAM
    +-- LCD and video
    +-- Timer
    +-- Sound
    +-- Serial
    +-- Input and interaction
    +-- Boot ROM
The motherboard is implemented in pyboy/core/mb.py. It creates and connects
the hardware components, routes memory accesses, coordinates interrupts and
DMA, and keeps the emulated hardware mode consistent between the components.
The main responsibilities of the core components are:
Component |
Responsibility |
|---|---|
CPU |
Executes instructions and advances the emulated cycle counter |
Cartridge/MBC |
Provides ROM and external RAM and handles bank switching |
RAM |
Stores work RAM, high RAM, and related memory state |
LCD |
Handles video timing, rendering, VRAM, and LCD interrupts |
Timer |
Updates the divider and timer registers and raises timer interrupts |
Sound |
Advances audio channels and produces sound samples |
Serial |
Handles serial transfers and serial interrupts |
Interaction |
Stores and processes Game Boy button input |
Boot ROM |
Provides startup behavior before cartridge execution |
The tick-based execution model
PyBoy advances emulation through PyBoy.tick(). The motherboard performs the
lower-level emulation step, and the CPU runs until the required cycle target is
reached. Time-dependent hardware is then advanced through tick(...) methods
using the CPU cycle count.
The simplified flow is:
PyBoy.tick()
  -> process input and plugin events
  -> MB.tick()
      -> cycles = CPU.tick(target)
      -> timer.tick(cycles)
      -> LCD.tick(cycles)
      -> sound.tick(cycles)
      -> handle interrupts and DMA
  -> run plugin post_tick() hooks
The motherboard is the synchronization point. The CPU, timer, LCD, sound, and
other clocked components do not run independent frame loops; their tick
functions use the shared emulated time to stay synchronized. Components that
are primarily memory-mapped, such as cartridge banking and RAM, participate
through motherboard reads and writes as the CPU accesses them.
When debugging timing behavior, start at MB.tick() and then follow the
component tick method involved in the behavior being investigated.
Plugin structure
Plugins live under pyboy/plugins/. The common interfaces are defined in
base_plugin.py, and PluginManager is responsible for creating enabled
plugins and dispatching their lifecycle methods.
Every plugin receives references to the PyBoy instance, the motherboard, and
the parsed command-line arguments. The base lifecycle methods are:
Method |
Purpose |
|---|---|
Determines whether the plugin is active |
|
Consumes or transforms input and window events |
|
Runs after the core has advanced |
|
Adds status text to the window title |
|
Releases plugin resources |
The main plugin categories are:
Window plugins: SDL2, OpenGL, GLFW, and null/headless windows
Feature plugins: debugging, rewind, recording, screenshots, and auto-pause
Game wrappers: game-specific helpers and state interpretation
A minimal plugin follows this shape:
from pyboy.plugins.base_plugin import PyBoyPlugin


class ExamplePlugin(PyBoyPlugin):
    argv = []

    def enabled(self):
        return True

    def post_tick(self):
        pass
To add a real plugin:
Add the plugin module under
pyboy/plugins/.Define its configuration and
enabled()behavior.Register it through the plugin manager’s registration points.
Add the required event and lifecycle dispatches.
Rebuild and test both enabled and disabled configurations.
Keep emulator hardware behavior in pyboy/core/. Use a plugin for optional
features, user interaction, rendering, recording, or game-specific behavior.
When investigating ordering issues, remember that plugins can process events
before emulation and receive
post_tick()
callbacks after the motherboard has advanced.
Code generators
Some parts of PyBoy are generated from a compact source description rather than maintained line by line. Change the generator inputs and logic, then regenerate the outputs; do not hand-edit generated sections.
CPU opcode generator
pyboy/core/opcodes_gen.py parses the Game Boy opcode table published by
Pastraiser and
generates the opcode handlers and Cython declarations used by the CPU:
pyboy/core/opcodes.py and pyboy/core/opcodes.pxd. The generated files
include the opcode dispatch function, instruction lengths, and command names.
The generator also contains PyBoy’s code-generation logic for instruction
semantics and timing.
Run it from the directory where its output files belong:
cd pyboy/core
python3 opcodes_gen.py
The generator downloads the opcode table, so it needs network access. Review
both generated files after running it; changes to instruction behavior belong
in opcodes_gen.py, not in the generated files.
Plugin manager generator
pyboy/plugins/manager_gen.py builds the plugin manager’s repeated
registrations from the plugin lists in that file. It fills marked sections in
manager.py, manager.pxd, plugins/__init__.py, and pyboy.py, and
generates the plugin reference index and game-wrapper API pages under
docs/plugins/.
Run it from the plugin directory so its relative input and output paths resolve correctly:
cd pyboy/plugins
python3 manager_gen.py
When adding a plugin or game wrapper, update the appropriate list in
manager_gen.py and regenerate the outputs. Add an entry to wrapper_titles
when a game wrapper needs a display name that differs from the generator’s
default. Plugin command-line options are documented from each plugin’s
argv metadata, so give options helpful descriptions there.
The make docs target runs manager_gen.py before building Sphinx pages.
It does not run opcodes_gen.py; regenerate opcode files explicitly when
changing the opcode generator.
After regeneration
Review and include the generated-file changes alongside the source changes.
If regenerated Cython declarations or sources changed, rebuild with
make clean && make, then run the relevant tests. Run make docs to verify
the documentation output.
Running the test suites
PyBoy has separate tests for the compiled core and for the pure-Python source. Install the test dependencies and run these commands from the repository root; see Getting started for setup instructions.
Compiled core tests: tests/
The tests in tests/ exercise the compiled Cython implementation:
python3 -m pytest tests/ -n auto -v
Build PyBoy first with make build. The -n auto and -v options are
optional; the first uses all available CPU cores and the second enables
verbose output.
Some tests use test ROMs. ROMs placed in test_roms/secrets/ are optional;
most permitted test ROMs are downloaded automatically. Commercial ROMs are not
distributed or downloaded.
API and documentation doctests: pyboy/, docs/
The tests under pyboy/ and the Markdown examples under docs/ can run
together against the compiled extension:
make build
python3 -m pytest pyboy/ docs/ -n auto --dist=loadscope -v
--dist=loadscope keeps doctest items from the same source file on one worker
to avoid races on shared files such as state_file.state.
The full local test workflow runs these doctests after building, followed by the compiled emulator tests:
make build
python3 -m pytest pyboy/ docs/ -n auto --dist=loadscope -v
python3 -m pytest tests/ -n auto -v
CI also tests the pure-Python implementation on PyPy. If PyPy is available, run the doctests and emulator tests there as well:
pypy3 -m pytest pyboy/ docs/ -v
pypy3 -m pytest tests/ -n auto -v
Wiki Markdown examples
The test collector in docs/conftest.py collects Python examples from Wiki
Markdown pages under docs/wiki/. RST pages are not collected by this hook.
The combined pyboy/ docs/ command above includes these examples. To run only
the Wiki examples while iterating:
python3 -m pytest docs/wiki/examples/ -n auto --dist=loadscope -v